# How to create a product launch video with HyperFrames

Build a 12 second, four scene product launch video from an empty folder with HyperFrames: the project layout, every file, the check and snapshot commands, a real render, and the mistakes the linter catches. Tested on HyperFrames 0.8.134.

A launch video does one job: get a stranger to understand what your product does in about ten seconds. This tutorial builds one from an empty folder with [HyperFrames](https://hyperframes.heygen.com), the open source framework that turns HTML and GSAP animation into an MP4. You will write every file, run the real commands, and end with a rendered video.

![The four scenes of the finished launch video: a hook, the product reveal, three features and a call to action](/answers/shots/hyperframes-launch/storyboard.webp)

Everything below was run on **HyperFrames 0.8.134** with Node.js 22, on a Mac. The product, Beacon, is made up. It needs no images, fonts or footage: every visual is HTML and CSS, so there is nothing to download.

## What you need

- **Node.js 22 or newer.**
- **FFmpeg** on your `PATH`.
- A terminal. No AI agent is needed, though HyperFrames supports them.

Check the machine first:

```bash
npx hyperframes doctor
```

```text
  ✓ FFmpeg           ffmpeg 9.0.2 at /opt/homebrew/bin/ffmpeg
  ✓ FFprobe          ffprobe 9.0.2 at /opt/homebrew/bin/ffprobe
  ✓ Chrome           cache: ~/.cache/hyperframes/chrome/chrome-headless-shell/...
```

`doctor` also lists optional tools such as local text to speech and music models. Those can show as not installed, and a failed optional check does not stop you rendering. If FFmpeg is missing, see [the install answer](/answers/hyperframes-install-failed-npx-skills-add).

## Step 1: plan four scenes

Decide the scenes before you write any code, because the code mirrors them. A launch video that works is usually one idea per scene:

| Scene | Seconds | What it says | Why it is there |
| --- | --- | --- | --- |
| Hook | 0.0 to 3.1 | "Your dashboards are out of date." | A problem the viewer recognises, in the first three seconds |
| Reveal | 2.8 to 6.6 | "Every metric. Live." beside the product | Shows the product doing the thing |
| Features | 6.4 to 9.4 | Three short promises | The proof, one line each |
| Call to action | 9.1 to 12.0 | "Beacon. Start free." | One next step |

Each scene overlaps the next by 0.3 seconds so they cross-fade rather than cut. For more on what makes the content work, see [what makes a good launch video](/blog/what-makes-a-good-launch-video) and [how to make a product launch video](/blog/how-to-make-a-product-launch-video).

## Step 2: create the project

```bash
npx hyperframes init hf-launch --example blank --non-interactive
cd hf-launch
```

This scaffolds a folder with `index.html`, `hyperframes.json`, `package.json` and agent instruction files, and links the HyperFrames skills into your agents' directories. It ends by listing the commands you will use:

```text
  4. Preview in the browser:
     cd hf-launch && npm run dev

  5. Check the composition:
     cd hf-launch && npm run check

  6. Render to MP4 when ready:
     cd hf-launch && npm run render
```

Add a folder for the scenes:

```bash
mkdir compositions
```

## Step 3: write the root, `index.html`

The root does three things: it sets the canvas (1920 by 1080, 30 fps, 12 seconds), it holds the page background and the type styles every scene shares, and it mounts each scene as a clip.

```html
<!doctype html>
<html lang="en">
  <head>
    <meta charset="UTF-8" />
    <meta name="viewport" content="width=1920, height=1080" />
    <script src="https://cdn.jsdelivr.net/npm/gsap@3.14.2/dist/gsap.min.js"></script>
    <style>
      * { margin: 0; padding: 0; box-sizing: border-box; }
      html, body { width: 1920px; height: 1080px; overflow: hidden; background: #08080a; }
      #root {
        position: relative; width: 1920px; height: 1080px; overflow: hidden;
        font-family: Inter, ui-sans-serif, system-ui, sans-serif; color: #ededef;
        background:
          radial-gradient(900px 600px at 15% 10%, rgba(124, 156, 255, 0.22), transparent 70%),
          radial-gradient(800px 600px at 90% 95%, rgba(22, 245, 189, 0.14), transparent 70%),
          #08080a;
      }
      .eyebrow { font-size: 26px; letter-spacing: 0.18em; text-transform: uppercase; color: #7c9cff; font-weight: 600; }
      .headline { font-size: 132px; line-height: 1.02; letter-spacing: -0.035em; font-weight: 700; }
      .muted { color: #8b8b95; }
    </style>
  </head>
  <body>
    <div
      id="root"
      data-composition-id="launch"
      data-start="0"
      data-duration="12"
      data-width="1920"
      data-height="1080"
      data-fps="30"
      data-no-timeline
    >
      <div id="scene-intro" class="clip" data-composition-id="intro" data-composition-src="compositions/intro.html"
           data-start="0" data-duration="3.1" data-track-index="0"></div>
      <div id="scene-reveal" class="clip" data-composition-id="reveal" data-composition-src="compositions/reveal.html"
           data-start="2.8" data-duration="3.8" data-track-index="1"></div>
      <div id="scene-features" class="clip" data-composition-id="features" data-composition-src="compositions/features.html"
           data-start="6.4" data-duration="3" data-track-index="0"></div>
      <div id="scene-outro" class="clip" data-composition-id="outro" data-composition-src="compositions/outro.html"
           data-start="9.1" data-duration="2.9" data-track-index="1"></div>
    </div>
  </body>
</html>
```

Four details are worth understanding, because they are where most first projects go wrong:

- **`data-no-timeline`** on the root says this file registers no GSAP timeline of its own: the animation lives in the scenes. Without it, the renderer waits for a timeline that never arrives, which costs about 45 seconds on every render. See [why renders take 45 seconds longer](/answers/hyperframes-render-takes-45-seconds-longer).
- **`class="clip"`** plus `data-start` and `data-duration` give each scene a window on the timeline. The runtime shows it only inside that window.
- **`data-composition-src`** points at the scene file. Paths resolve from the project root, never from the file doing the referencing.
- **Alternating `data-track-index`** puts overlapping scenes on different rows in the studio, so the cross-fade stays readable. Tracks are rows in the editor, not layers; use CSS `z-index` for paint order.

Inter is named in the font stack but no file is declared. HyperFrames fetched it from Google Fonts and embedded it for the render (`check` logs `Fetched 11 font face(s) for "Inter" from Google Fonts`), which is fine for a local project. For anything cloud rendered, ship the font file: see [the fonts answer](/answers/hyperframes-fonts-wrong-in-render).

## Step 4: the hook, `compositions/intro.html`

A scene file wraps everything in a `<template>`, scopes its CSS to its own composition ID, and registers its own paused timeline. Time inside the file is **local**: zero is the moment the scene starts on the main timeline.

```html
<template id="intro-template">
  <div data-composition-id="intro" data-width="1920" data-height="1080">
    <div class="eyebrow">Introducing</div>
    <h1 class="headline">
      <span class="word">Your</span> <span class="word">dashboards</span><br />
      <span class="word">are</span> <span class="word muted">out</span>
      <span class="word muted">of</span> <span class="word muted">date.</span>
    </h1>

    <style>
      [data-composition-id="intro"] {
        position: absolute; inset: 0; display: flex; flex-direction: column;
        align-items: center; justify-content: center; text-align: center; gap: 36px;
      }
      [data-composition-id="intro"] .word { display: inline-block; }
    </style>

    <script>
      const tl = gsap.timeline({ paused: true });
      const ease = "power3.out";
      const q = (s) => `[data-composition-id="intro"] ${s}`;

      tl.fromTo(q(".eyebrow"), { opacity: 0, y: 20 }, { opacity: 1, y: 0, duration: 0.5, ease }, 0.1);
      tl.fromTo(q(".word"), { opacity: 0, y: 60 }, { opacity: 1, y: 0, duration: 0.6, ease, stagger: 0.12 }, 0.25);
      tl.fromTo('[data-composition-id="intro"]', { opacity: 1 }, { opacity: 0, duration: 0.3, ease: "none" }, 2.8);

      window.__timelines["intro"] = tl;
    </script>
  </div>
</template>
```

![The hook scene at 1.2 seconds: the headline Your dashboards are out of date, with the last three words in grey](/answers/shots/hyperframes-launch/01-hook.webp)

The rules this file follows, and why:

- **The timeline is created paused and registered under the same ID as `data-composition-id`.** HyperFrames seeks it to an exact time on every frame. A mismatch gives you [a static animation](/answers/hyperframes-animation-is-static).
- **Every tween is a `fromTo` with both ends stated**, including `opacity: 1` at the end. A render worker that seeks straight to a frame restores the authored state, so an element that never states its visible end can stay hidden. See [the cold-seek answer](/answers/hyperframes-element-hidden-in-render-but-visible-in-preview).
- **The scene fades itself out** over its last 0.3 seconds, which is `data-duration` (3.1) minus 0.3, so it dissolves as the next one rises.
- **Nothing reads the clock or uses randomness.** The full list is in [the determinism checklist](/answers/hyperframes-determinism-rules).

## Step 5: the reveal, `compositions/reveal.html`

The longest scene: copy on the left, a dashboard on the right built from plain `div` elements, KPI tiles that rise in, and bars that grow from the baseline.

```html
<template id="reveal-template">
  <div data-composition-id="reveal" data-width="1920" data-height="1080">
    <div class="copy">
      <div class="eyebrow">Meet Beacon</div>
      <h2 class="headline">Every metric. Live.</h2>
      <p class="sub">One screen for revenue, signups and churn, updated as it happens.</p>
    </div>

    <div id="dash">
      <div class="bar"><span class="dot"></span><span class="dot"></span><span class="dot"></span></div>
      <div class="kpis">
        <div class="kpi"><div class="label">Revenue</div><div class="value">$48.2k</div></div>
        <div class="kpi"><div class="label">Signups</div><div class="value">1,284</div></div>
        <div class="kpi"><div class="label">Churn</div><div class="value">1.9%</div></div>
      </div>
      <div class="chart">
        <div class="col" style="height: 38%"></div><div class="col" style="height: 52%"></div>
        <div class="col" style="height: 45%"></div><div class="col" style="height: 68%"></div>
        <div class="col" style="height: 60%"></div><div class="col" style="height: 82%"></div>
        <div class="col" style="height: 96%"></div>
      </div>
    </div>

    <style>
      [data-composition-id="reveal"] { position: absolute; inset: 0; display: flex; align-items: center; padding: 0 140px; gap: 90px; }
      [data-composition-id="reveal"] .copy { width: 640px; display: flex; flex-direction: column; gap: 28px; }
      [data-composition-id="reveal"] .headline { font-size: 104px; }
      [data-composition-id="reveal"] .sub { font-size: 36px; line-height: 1.35; color: #a1a1aa; }
      [data-composition-id="reveal"] #dash {
        width: 980px; height: 640px; border-radius: 28px; background: #0f0f12;
        border: 2px solid rgba(255, 255, 255, 0.1); box-shadow: 0 40px 120px rgba(0, 0, 0, 0.6);
        padding: 36px 40px; display: flex; flex-direction: column; gap: 28px;
      }
      [data-composition-id="reveal"] .bar { display: flex; gap: 12px; }
      [data-composition-id="reveal"] .dot { width: 16px; height: 16px; border-radius: 50%; background: #2a2a31; }
      [data-composition-id="reveal"] .kpis { display: flex; gap: 24px; }
      [data-composition-id="reveal"] .kpi { flex: 1; background: #17171b; border-radius: 18px; padding: 24px 26px; }
      [data-composition-id="reveal"] .label { font-size: 22px; color: #8b8b95; }
      [data-composition-id="reveal"] .value { font-size: 52px; font-weight: 700; letter-spacing: -0.02em; margin-top: 8px; }
      [data-composition-id="reveal"] .chart { flex: 1; display: flex; align-items: flex-end; gap: 22px; padding: 0 8px; }
      [data-composition-id="reveal"] .col {
        flex: 1; border-radius: 12px 12px 4px 4px; transform-origin: 50% 100%;
        background: linear-gradient(180deg, #7c9cff, #3a55c9);
      }
    </style>

    <script>
      const tl = gsap.timeline({ paused: true });
      const ease = "power3.out";
      const q = (s) => `[data-composition-id="reveal"] ${s}`;

      tl.fromTo(q(".copy > *"), { opacity: 0, x: -40 }, { opacity: 1, x: 0, duration: 0.6, ease, stagger: 0.12 }, 0.2);
      tl.fromTo(q("#dash"), { opacity: 0, y: 80, scale: 0.96 }, { opacity: 1, y: 0, scale: 1, duration: 0.8, ease }, 0.4);
      tl.fromTo(q(".kpi"), { opacity: 0, y: 24 }, { opacity: 1, y: 0, duration: 0.5, ease, stagger: 0.1 }, 0.9);
      tl.fromTo(q(".col"), { scaleY: 0 }, { scaleY: 1, duration: 0.7, ease: "back.out(1.4)", stagger: 0.07 }, 1.2);
      tl.fromTo('[data-composition-id="reveal"]', { opacity: 1 }, { opacity: 0, duration: 0.3, ease: "none" }, 3.5);

      window.__timelines["reveal"] = tl;
    </script>
  </div>
</template>
```

![The reveal scene at 4.8 seconds: the headline Every metric. Live. beside a dashboard with three KPI tiles and a rising bar chart](/answers/shots/hyperframes-launch/02-reveal.webp)

Two choices here are deliberate. The bars animate `scaleY` from the baseline rather than `height`, because transforms are cheap and layout properties are not: the docs advise animating transforms and opacity rather than `top`, `left`, `width` or `height`. And the whole dashboard is HTML, so there is no screenshot to export and re-export when a number changes.

> **Would you rather describe this than write it?**
>
> Everything in the five files above is what GenMotion's agent writes for you. In GenMotion Studio you describe the video, and it creates the same structure as a HyperFrames project you own: an `index.html` timeline with one slot per scene, and one file per scene under `scenes/`. You scrub it frame by frame in the editor, ask for changes in plain language, and export the MP4 on your own machine. Choose HyperFrames in the engine picker when you start a project.
>
> Prompt:
>
> Make a 12 second product launch video for Beacon, a real-time analytics dashboard. Four scenes. First, a hook: "Your dashboards are out of date." Second, a reveal: "Every metric. Live." beside a dashboard with three KPI tiles and a bar chart that grows in. Third, three features: live metrics, instant answers, shared in one click. Fourth, a closing card with the name Beacon and a "Start free" button. Dark background, indigo accent, clean modern type.

## Step 6: the features, `compositions/features.html`

```html
<template id="features-template">
  <div data-composition-id="features" data-width="1920" data-height="1080">
    <div class="row"><div class="badge">1</div><div><div class="t1">Live metrics</div><div class="t2">No refresh button. No stale numbers.</div></div></div>
    <div class="row"><div class="badge">2</div><div><div class="t1">Instant answers</div><div class="t2">Ask a question, get the chart.</div></div></div>
    <div class="row"><div class="badge">3</div><div><div class="t1">Shared in one click</div><div class="t2">A link your whole team can open.</div></div></div>

    <style>
      [data-composition-id="features"] { position: absolute; inset: 0; display: flex; flex-direction: column; align-items: center; justify-content: center; gap: 56px; }
      [data-composition-id="features"] .row { display: flex; align-items: center; gap: 44px; width: 980px; }
      [data-composition-id="features"] .badge {
        width: 120px; height: 120px; border-radius: 32px; display: grid; place-items: center;
        font-size: 56px; font-weight: 700; background: rgba(124, 156, 255, 0.16); color: #9db3ff;
        border: 2px solid rgba(124, 156, 255, 0.35);
      }
      [data-composition-id="features"] .t1 { font-size: 72px; font-weight: 650; letter-spacing: -0.03em; }
      [data-composition-id="features"] .t2 { font-size: 34px; color: #8b8b95; margin-top: 6px; }
    </style>

    <script>
      const tl = gsap.timeline({ paused: true });
      const ease = "power3.out";

      tl.fromTo('[data-composition-id="features"] .row', { opacity: 0, x: -60 }, { opacity: 1, x: 0, duration: 0.6, ease, stagger: 0.35 }, 0.2);
      tl.fromTo('[data-composition-id="features"]', { opacity: 1 }, { opacity: 0, duration: 0.3, ease: "none" }, 2.7);

      window.__timelines["features"] = tl;
    </script>
  </div>
</template>
```

![The features scene at 8.2 seconds: three numbered rows, Live metrics, Instant answers and Shared in one click](/answers/shots/hyperframes-launch/03-features.webp)

## Step 7: the call to action, `compositions/outro.html`

```html
<template id="outro-template">
  <div data-composition-id="outro" data-width="1920" data-height="1080">
    <div class="brand">Beacon</div>
    <div class="cta">Start free</div>
    <div class="url">beacon.example</div>

    <style>
      [data-composition-id="outro"] {
        position: absolute; inset: 0; display: flex; flex-direction: column;
        align-items: center; justify-content: center; gap: 44px; text-align: center;
      }
      [data-composition-id="outro"] .brand { font-size: 200px; font-weight: 800; letter-spacing: -0.05em; }
      [data-composition-id="outro"] .cta {
        font-size: 44px; font-weight: 600; color: #08080a; background: #ededef;
        padding: 30px 64px; border-radius: 999px;
      }
      [data-composition-id="outro"] .url { font-size: 34px; color: #8b8b95; letter-spacing: 0.02em; }
    </style>

    <script>
      const tl = gsap.timeline({ paused: true });
      const ease = "power3.out";
      const q = (s) => `[data-composition-id="outro"] ${s}`;

      tl.fromTo(q(".brand"), { opacity: 0, scale: 0.9 }, { opacity: 1, scale: 1, duration: 0.7, ease }, 0.2);
      tl.fromTo(q(".cta"), { opacity: 0, y: 30 }, { opacity: 1, y: 0, duration: 0.5, ease }, 0.8);
      tl.fromTo(q(".url"), { opacity: 0 }, { opacity: 1, duration: 0.5, ease: "none" }, 1.1);

      window.__timelines["outro"] = tl;
    </script>
  </div>
</template>
```

The last scene has no fade-out: it is the end of the video, so it simply holds.

![The closing scene at 10.8 seconds: the name Beacon, a Start free button and the address beacon.example](/answers/shots/hyperframes-launch/04-outro.webp)

## Step 8: lint and check

Two commands, and they check different things.

```bash
npx hyperframes lint
```

```text
◇  0 errors, 0 warnings
```

That was not the first result. My first version put all four scenes directly inside `index.html` as `<section>` elements, and the linter warned about each one:

```text
⚠ nested_structure_needs_subcomposition [s1]: <section id="s1"> is a timeline element that
  contains nested <div>. The timeline shows one row per top-level element, and the root
  composition is built only from sub-compositions.
  Fix: Move <section id="s1"> and its contents into a sub-composition file and mount it with
  data-composition-src.
```

That warning is why this tutorial uses one file per scene. The message gives the reason: the timeline shows one row per top-level element, so scenes belong in their own composition files.

Now the full gate:

```bash
npx hyperframes check
```

```text
Lint
  ◇ 0 errors, 0 warnings

Runtime
  ◇ 0 errors, 0 warnings

Layout
  ◇ 0 issues across 9 sample(s)

Motion
  ◇ 0 errors, 0 warnings

Contrast
  ◇ 29/29 text checks pass WCAG AA

◇  Check passed
```

`check` runs the linter, validates the page in headless Chrome for JavaScript errors and missing assets, inspects the layout at sampled times, checks the motion, and tests text contrast against WCAG AA. It checks that the file is **valid**, not that the video is **right**. See [why a green check can still mean a wrong video](/answers/hyperframes-check-passed-but-the-video-is-wrong), which is why the next step matters.

Confirm HyperFrames resolved the project the way you meant:

```bash
npx hyperframes compositions
```

```text
◇  hf-launch — 5 compositions

   launch     12.0s   1920×1080   4 elements
   intro      0.6s   1920×1080   9 elements ← compositions/intro.html
   reveal     0.8s   1920×1080   27 elements ← compositions/reveal.html
   features   0.6s   1920×1080   15 elements ← compositions/features.html
   outro      0.7s   1920×1080   3 elements ← compositions/outro.html
```

The root is 12 seconds at 1920 by 1080. The shorter figures on the scenes are the length of each scene's own timeline; the slot it occupies on the main timeline is the host's `data-duration`. If the root ever shows the wrong duration or composition, you are rendering [the wrong file](/answers/hyperframes-render-black-wrong-entry-file).

## Step 9: look at real frames

```bash
npx hyperframes snapshot --at 1.2,4.8,8.2,10.8
```

```text
◇  5 snapshots saved to snapshots/
   snapshots/frame-00-at-1.2s.png
   snapshots/frame-01-at-4.8s.png
   snapshots/frame-02-at-8.2s.png
   snapshots/frame-03-at-10.8s.png
   snapshots/frame-04-at-11.64s.png
```

These are the images in the steps above. Pick a time **inside** each scene's window, not just the start: frame zero looks fine in nearly every kind of bug, and a scene that is empty at its midpoint is the one you need to catch. HyperFrames also adds a final frame near the end of the timeline for you.

## Step 10: preview in the studio

```bash
npm run dev
```

This starts HyperFrames Studio on a local port and reloads when you save a file.
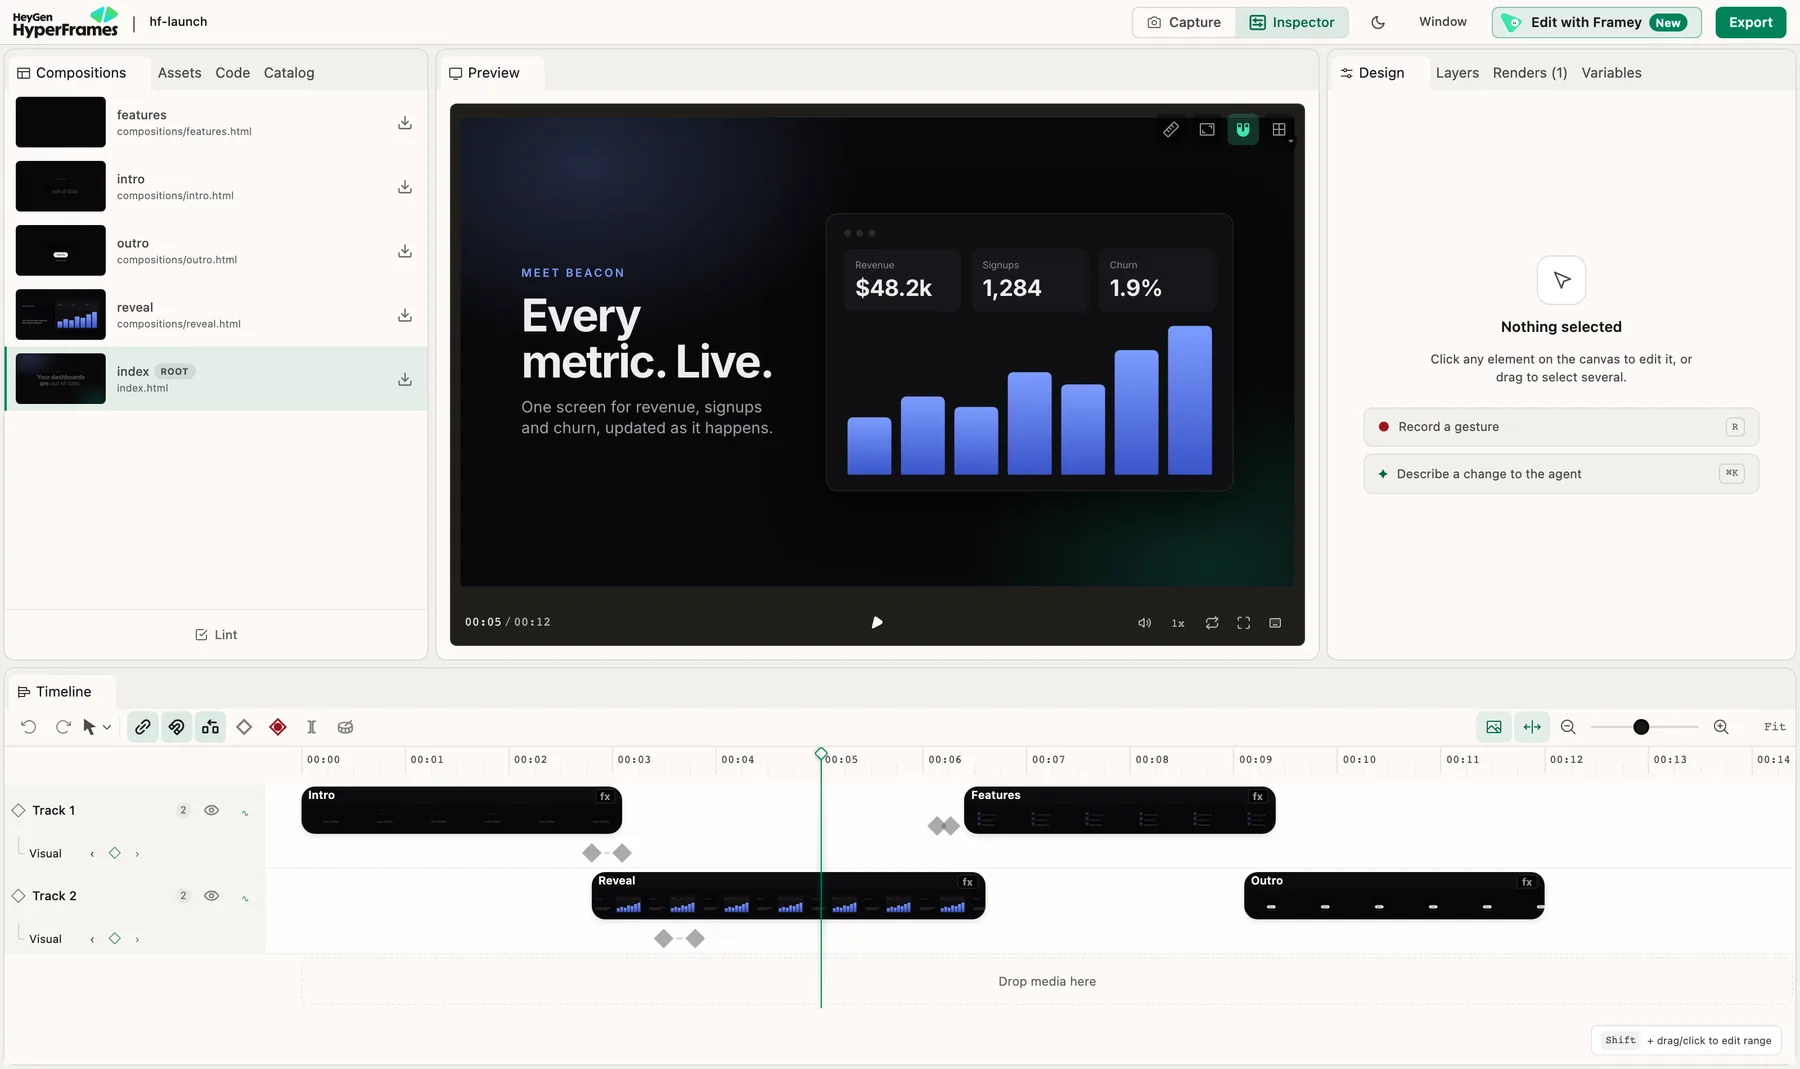
![HyperFrames Studio with the launch video open: the four scenes listed on the left, the preview in the centre, and the scenes laid out on two timeline tracks](/answers/shots/hyperframes-launch/studio.webp)

The compositions list shows `intro`, `reveal`, `features` and `outro` as separate files, and the timeline shows them on two tracks, overlapping where we asked for the cross-fade. Scrub the playhead to any time to see the frame. Preview plays in real time and can stutter on a heavy scene even when the render is perfect.

## Step 11: render the MP4

```bash
npx hyperframes render --output renders/beacon.mp4
```

```text
◇  renders/beacon.mp4
   1.5 MB · 12.0s video · rendered in 7.9s
   screenshot capture · hardware gpu · compile 0.4s · extract 0.0s · audio 0.0s · probe 0.0s · setup 1.7s · capture 4.9s · encode 0.8s · assemble 0.0s
```

Verify the file rather than trusting the summary:

```bash
ffprobe -v error -show_entries stream=codec_name,width,height,r_frame_rate,duration -of default=nw=1 renders/beacon.mp4
```

```text
codec_name=h264
width=1920
height=1080
r_frame_rate=30/1
duration=12.000000
```

An H.264 file, 1920 by 1080, 30 fps, exactly 12 seconds. The summary also prints the capture mode and the time per stage, which tells you where a slow render is spending its time. Those numbers came from an Apple M4 Pro, and a draft render (`--quality draft`) took 9.7 seconds and produced 1.2 MB, so on a project this small it is not faster. Use draft on heavy projects. For the full set of reasons a render can be slow, see [why a HyperFrames render is slow](/answers/hyperframes-render-is-slow).

## Where to go next

- **Add a voiceover and captions.** See [how to add a voiceover and captions](/answers/hyperframes-add-voiceover-and-captions). HyperFrames can generate speech locally and transcribe it into word level timestamps.
- **Change the look.** Colours, type sizes and copy are plain CSS and text in the scene files. Re-run `check` and `snapshot` after every change.
- **Render for exact reproducibility.** `npx hyperframes render --docker --output beacon.mp4` pins the browser, fonts and encoder. See [the determinism checklist](/answers/hyperframes-determinism-rules).
- **If something goes wrong.** A black frame is almost always one of [seven causes](/answers/hyperframes-render-is-black).
- **Compare with the same video in Remotion.** [How to create a product launch video with Remotion](/answers/how-to-create-a-product-launch-video-with-remotion) builds this exact video in React, so you can see both approaches side by side.

## From a prompt to this video, without writing the scenes

A launch video is four or five scenes and a message, and most of the time above went into layout and timing rather than the message. GenMotion Studio takes the description, writes the HyperFrames scenes for you, and lets you scrub, change and re-time them in a frame-accurate preview. Add narration and music, then export the MP4 on your own machine. It is free to start, with no watermark. [How the HyperFrames engine works in GenMotion](/blog/hyperframes-engine-in-genmotion).

## Related

- [How to create a product launch video with Remotion](https://genmotion.dev/answers/how-to-create-a-product-launch-video-with-remotion)
- [What are the HyperFrames determinism rules, in one checklist?](https://genmotion.dev/answers/hyperframes-determinism-rules)
- [How do I add a voiceover and captions to a HyperFrames video?](https://genmotion.dev/answers/hyperframes-add-voiceover-and-captions)
- [Why is my HyperFrames render black?](https://genmotion.dev/answers/hyperframes-render-is-black)
- [Why does every HyperFrames render take 45 seconds longer than it should?](https://genmotion.dev/answers/hyperframes-render-takes-45-seconds-longer)

## FAQ

### How long does a HyperFrames render take?

For this project, a 12 second 1920 by 1080 video at 30 frames per second, a default quality render took 7.9 seconds on an Apple M4 Pro and produced a 1.5 MB file. A draft render took 9.7 seconds and produced 1.2 MB, so on a project this small draft was not faster. Your numbers will depend on the machine and on how heavy the effects are.

### Do I need an AI agent to use HyperFrames?

No. Everything here was written by hand and run from the command line. HyperFrames also ships skills so a coding agent can write compositions for you, and its init command links them into your agent's directories.

### Why one file per scene?

Because the linter asks for it. HyperFrames warns when a timed element in the root contains nested elements, because the timeline shows one row per top-level element and the root composition is meant to be built from sub-compositions. It also keeps each file small enough to read and re-time on its own.

### Can I make this vertical for social?

Yes. Set data-width and data-height to 1080 and 1920 on the root and on each sub-composition, and rework the layouts, which here assume a 16:9 frame. The scenes are plain HTML and CSS, so this is a layout change rather than a rewrite.

## Sources

- [HyperFrames: Compositions](https://hyperframes.heygen.com/concepts/compositions)
- [HyperFrames: Time elements with data attributes](https://hyperframes.heygen.com/concepts/data-attributes)
- [HyperFrames: Animate with GSAP](https://hyperframes.heygen.com/guides/gsap-animation)
- [HyperFrames: Render from the command line](https://hyperframes.heygen.com/guides/rendering)
- [HyperFrames: Troubleshooting](https://hyperframes.heygen.com/guides/troubleshooting)

Canonical: https://genmotion.dev/answers/how-to-create-a-product-launch-video-with-hyperframes
